How point my domain?
There are a couple of ways to link your domain to your Power-eCommerce store. Which method you use depends on when and how your domain was registered.
If the domain name is already registered by you, then after sign up you will simply need to go to your domain's registrar (i.e. GoDaddy, Register.com, NameCheap.com etc) and update your domain's DNS records to the following "A Records":
Before you begin you need to get your Stores IP Address from your Profile.
- Log into your Power-eCommerce Admin
- At the Top Right of the Admin you will see your Name Click on this and select your "Profile".
- On the Right side of the Profile page you will see "Account Info" your IP Address is located here, it will be in the format of 123.123.123.123, 123.12.123.123 or similar.
- No Login to where you registered your domain name (i.e. GoDaddy, Register.com, NameCheap.com etc).
- Follow the guides below for where your domain is registered.
- When you have completed the DNS change, please contact [email protected] and confirm the change.
- Please remember to only update the "A" record, do not update or change your MX records otherwise your email will be interrupted.
GoDaddy.com:
Change an A record
An A (host) record connects your domain name to your IP address. A records let users enter your domain name in a Web browser to access your website.
Looks like you're not logged in. If you log in above (under ![]() ), we can save you a couple of steps.
), we can save you a couple of steps.
- Go to the DNS Management page.
- On the DNS Management page, in the Records section, click the (pencil icon) next to A
- Change the IP address to the one from your Profile Page, and click Save when finished.
Add an A record
- Go to the DNS Management page.
- On the DNS Management page, at the bottom of the Records section, click Add and select A from the menu.
- Complete the other fields:
- Host Name - Enter the host name the A record links to. Type @ to point the record directly to your domain name, including the www.
- Points to IP Address - Enter the IP address to the one from your Profile Page.
- TTL - Select how long the server should cache the information: 600 is standard.
- Click Save.
NameCheap.com:
It is possible to set up an A record from Namecheap's side for domains that are using our BasicDNS, BackupDNS (a legacy option), PremiumDNS or FreeDNS.
If your domain is pointed to any of these DNS systems, perform the following actions to create an A (address) record for it:
1. Sign into your Namecheap account (The Sign In option is available in the top hat of the page).
2. Select Domain List from the left sidebar and click on the Manage button next to your domain: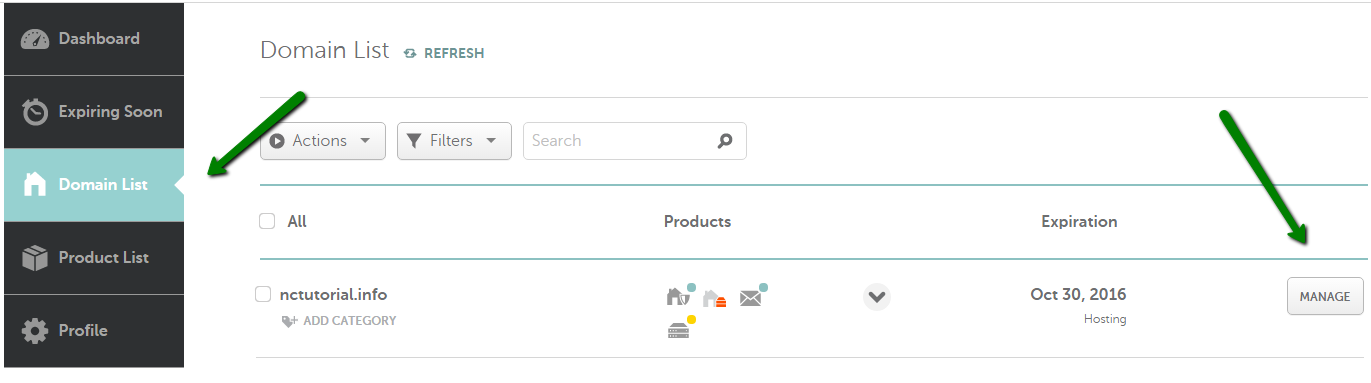
3. Navigate to the Advanced DNS tab at the top of the page: 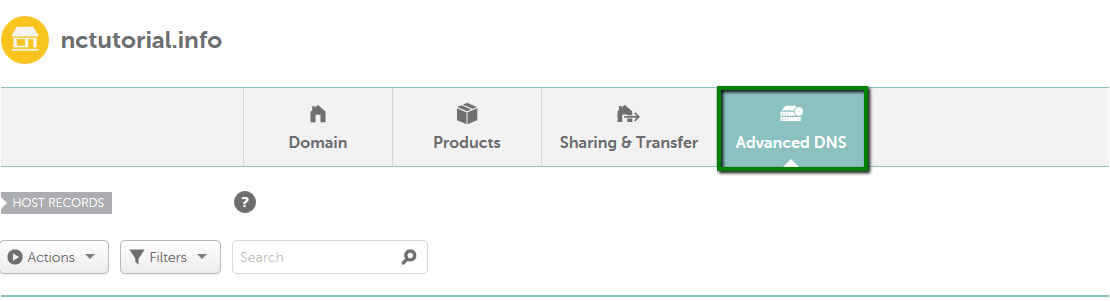
4. Find the Host records section and click on the Add New Record button (not able to edit Host Records?):
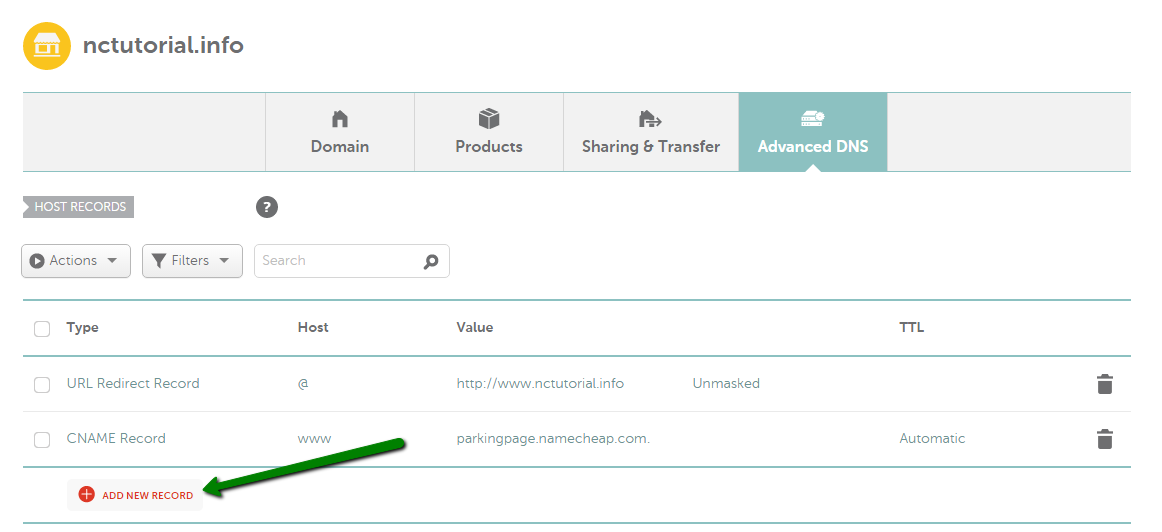
5. Select A Record for Type and enter the Host you would like to point to an IP address:
@ - used to point a root domain (yourdomain.tld) to the IP address:
A Record | @ | 11.22.33.44
www - is selected when it is needed to point www.yourdomain.tld to the IP address:
A Record | www | 11.22.33.44
[any host] - you can insert any name of a subdomain that should be pointed to the IP address:
A Record | blog | 11.22.33.44
* - a wildcard record that matches requests for non-existent subdomains:
A Record | * | 11.22.33.44
6. Once all details are inserted, save them using the Save changes green icon.
Normally, it takes 30 minutes for newly created records to take effect.
Once you've done so, you might also want to make sure that there are no conflicting records set for the same host and remove them, if there are any. The records you need to check may be of Unmasked/Masked/Permanent Redirect, A or CNAME record types.
Here is the example of conflicting records: 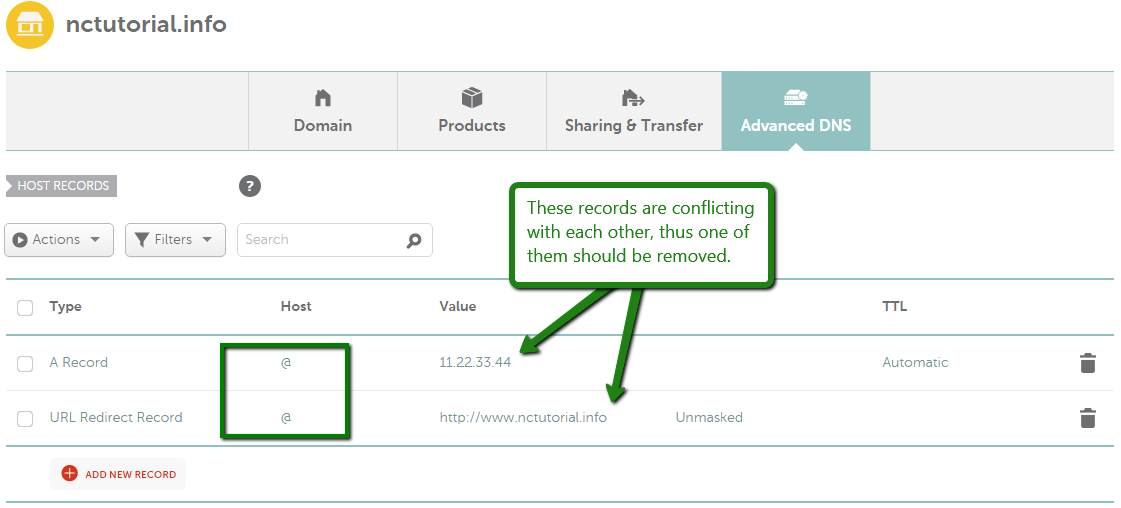
and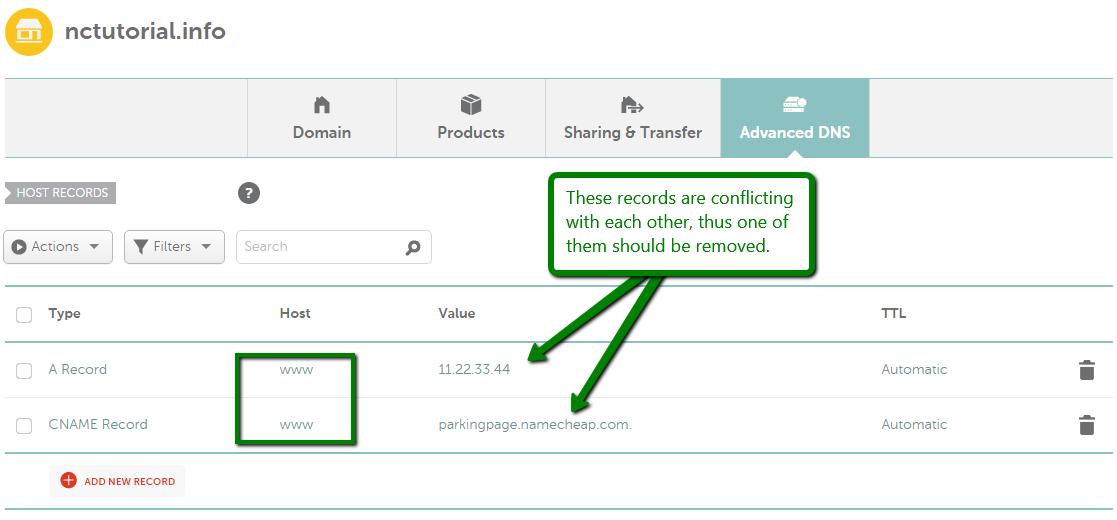
Register.com
IP Address Set-Up
If you chose the default setting when you purchased your hosting account, you don't need to make any changes to your IP address, we've done all the work for you.
|
If you picked the advanced option when you purchased hosting, follow these instructions to change your IP address and set up your hosting account:
|
NetworkSolutions.com
A Records (IP Addresses)
All servers connected to the Internet are assigned a unique IP address. An A record associates a name to the server IP address, allowing people to use easy-to-remember domain names (rather than hard-to-remember IP addresses) to connect to a website. For example, you could enter the IP address 216.168.224.69 in your Web browser to reach the Network Solutions®® website, or you could simply enter www.NetworkSolutions.com.
Before you begin editing A records, you should:
· Know the associated IP addresses
· Understand that DNS updates will take up to 2 hours to take effect (updates may resolve more quickly at some locations than others because many name servers on the Internet retrieve updates at different times).
To update A records
1. Log in to Account Manger
2. Within Account Manager, use the drop down under My Domain Names to choose the domain you’d like to manage and click the Go button
3. In the green box, select Change Where Domain Points
4. Select Advanced DNS
5. Click the Continue button
6. If the domain name was not previously pointed to Network Solutions® nameservers (DNS) you will receive a page with messaging regarding this change. If you’d like to continue, click the Move Nameservers to Network Solutions® button
7. In the IP Address (A Records) section, click Edit A Records
8. Your current A records are listed in editable form, and any Network Solutions® service that is associated with the A record is listed below the Numeric IP text box
9. The first three hosts listed are the most common hosts used with domain names:
o www : Points to the specified IP address when Internet users enter an address, such as www.jimbikes.com
o @ (none) : Points to the specified IP address when a user enters just the domain name without anything before it, such as jimsbikes.com
o * (All OThers) : Points any unassociated host for a domain name to the specified IP address, similar to a catch-all feature that could be used for any misspelled host names
To add or edit A records
1. Enter or edit the new host name in the Host column
2. If needed, modify the TTL settings (7200 is the default)
3. Enter or edit the IP number under the Numeric IP Address column in any remaining empty row
4. Click Continue
To delete A records
1. To the right of the A record, select the check box in the Delete column
2. Click Continue
3. Review the list of requested changes
4. Click Continue
This documentation is always evolving. If you've not been here for a while, perhaps check out the This documentation is always evolving.